Mining in Star Citizen is a lucrative and engaging career path that takes you across the stars in search of valuable resources. Whether you’re chipping gemstones out of a cave wall or fracturing massive asteroids, mining rewards skill, planning, and a bit of daring. This complete guide will take you from a beginner learning the basics to an expert miner optimizing every haul. Get ready to dig deep into the mining profession!
Getting Started: Personal Mining Basics
Every miner’s journey starts with the right tools. The easiest entry into mining is hand mining, which requires minimal investment. Pick up a Pyro RYT Multi-Tool and attach an OreBit Mining attachment. Don a backpack like the MacFlex “Rucksack” Core to carry your haul, and you’re ready to go. With this setup, you can mine small mineral deposits (gemstones) found on planetary surfaces or inside caves. Look for shiny crystal outcrops of Hadanite, Dolivine, or Aphorite – these glowing gems can be extracted with the multi-tool and sold for a quick profit. In particular, Hadanite (a distinctive pink-purple gem) is a favorite starting resource due to its high value.
New to mining? Equip a mining multitool and search for caves on moons like Daymar or Aberdeen. Caves often contain Hadanite and even rare Janalite gems. Janalite is extremely valuable, so finding just a few can jump-start your funds as a new miner!
Hand mining is straightforward: approach the mineral vein, aim your multi-tool (default key 4 to equip, then right-click to aim), and begin the fracturing process by holding left-click. A charge gauge will appear – use the mouse wheel to adjust laser power. Your goal is to keep the rock’s energy level in the green zone without overcharging (into the red). If you successfully keep it in the sweet spot, the gem will fracture and you can collect the pieces. If you overcharge, the gem could explode and be destroyed, so practice gentle power adjustments. With a bit of patience, you’ll fill your backpack with gemstones. Sell these at a trading console (found at many outposts or major stations) to build up your starting capital.
Moving Up: Vehicle Mining with the ROC
Once you’ve earned some alpha UEC from hand mining, you might be ready to scale up. The Greycat ROC (Remote Ore Collector) is a one-person mining ground vehicle designed to harvest larger mineral nodes on planet surfaces. The ROC’s laser can crack medium-sized crystalline deposits that are too tough for a hand tool, yielding more gemstones per node (often Hadanite clusters worth much more in total). If you don’t own a ROC, consider renting one at a planetary mining outpost or buying one when you have the funds.
To use the ROC effectively, you’ll need a ship with cargo space to transport it (something like a Cutlass Black, Freelancer, or anything with at least a vehicle bay). Drive the ROC out to mining areas (for example, the flat plains of Daymar or Yela where gem deposits are common). Use its scanner (press Tab while in the ROC to ping) to find minable rocks, which will appear as small indicators. Switch the ROC to mining mode (default key M) and use the turret-mounted laser to fracture the gemstone deposit similar to hand mining: slowly increase power with the mouse wheel and keep the rock’s energy in the green range. The ROC has an on-board storage (approximately 0.8 SCU, roughly one small cargo box worth) to collect the gems you mine.
The ROC can be quite profitable early on, though it’s best used in relatively safe areas since you’re exposed on the ground. Always park your transport ship nearby and be mindful of the environment (e.g. avoid extreme terrain that could tip your vehicle). Many miners use the ROC to amass enough earnings to move into ship-based mining.
When using the ROC, avoid overcharging rocks! If a rock is very unstable and you push the laser too hard, it can explode and even disable your ROC. If a deposit isn’t cracking, back off the power or try a different rock. Also, always double-check that your ship is securely landed; nothing is worse than returning with a ROC full of gems to find your ship has drifted off!
The Prospector: Your First Mining Ship
Graduating to a dedicated mining ship is a milestone for any miner. The MISC Prospector is a single-seat mining ship and the backbone of solo mining operations across the Stanton system. With the Prospector, you can search asteroid fields and planetary surfaces for mineable ore deposits such as Quantanium, Bexalite, Taranite, Gold, and more. The ship’s mining laser and saddlebag storage (32 SCU capacity) allow you to collect far larger quantities of ore than any handheld tool or ROC.
Setting up: If you don’t own a Prospector, you can rent one at major hubs (like Vantage Rentals at Lorville or similar rental kiosks at other cities) to try it out. Keep in mind that rental ships come with a stock mining laser and can’t be modified. As you progress, you’ll want to purchase your own Prospector and upgrade its mining head and components for better performance (more on that shortly).
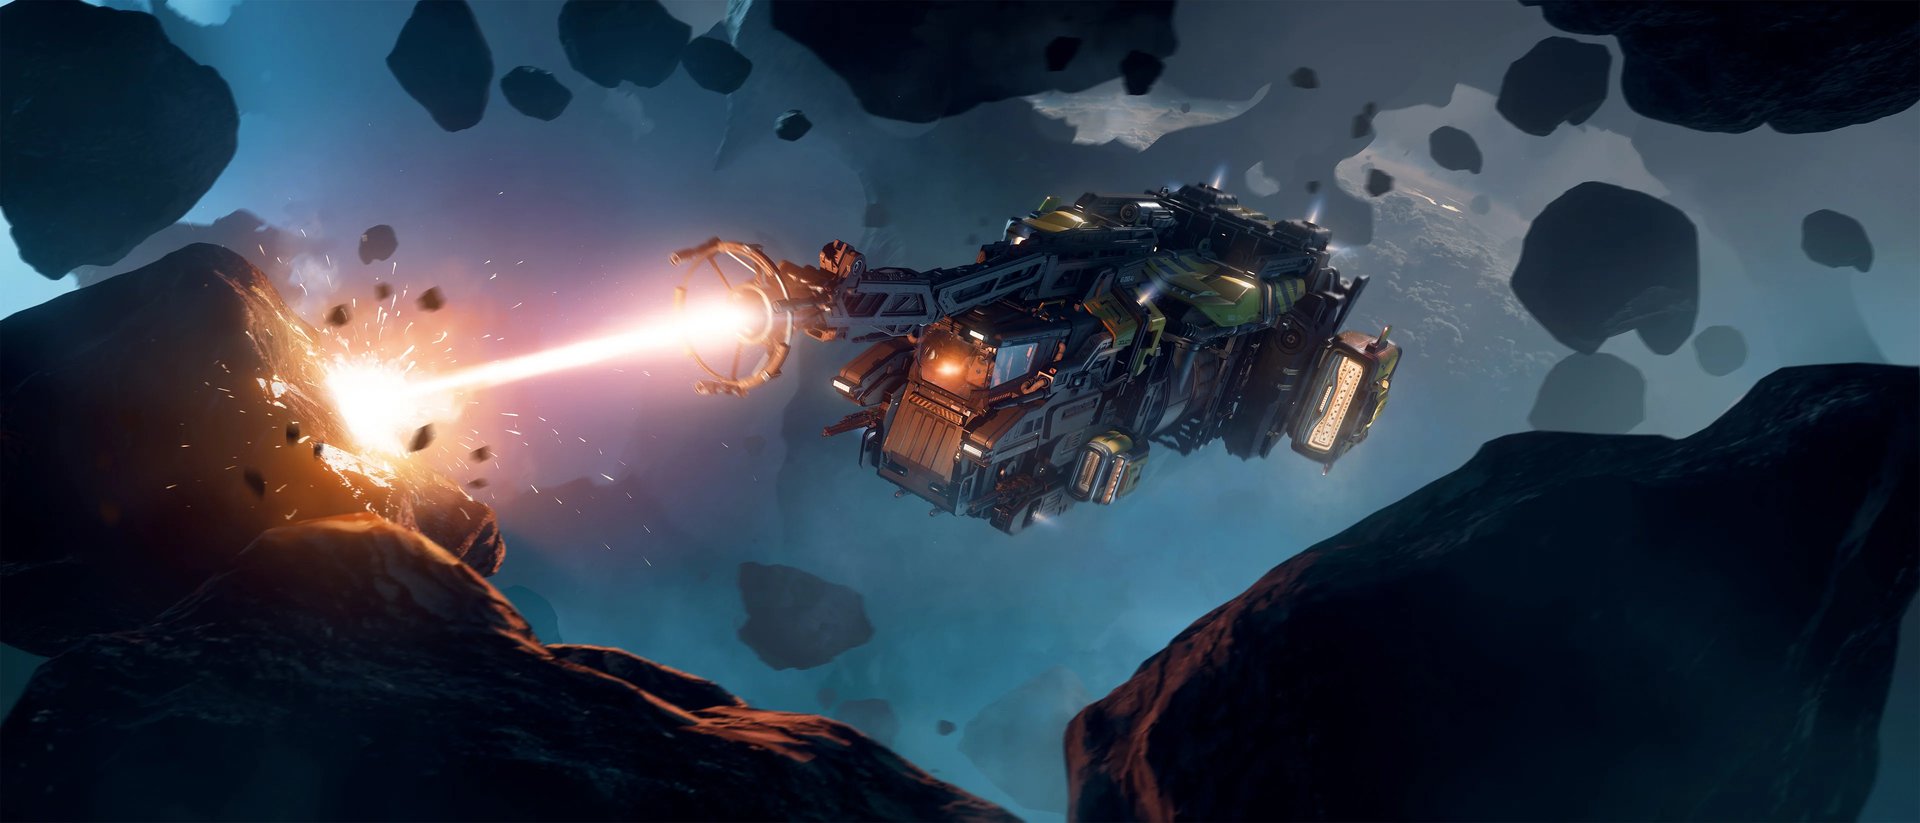
Finding resources: Use the Prospector’s scanner to locate mineable rocks. Hit the Tab key to activate scanning mode, then hold and release the right mouse button to send out a ping. Asteroid clusters (for example, the Aaron Halo asteroid belt between ArcCorp and Crusader, or clusters near Lagrange points like ARC-L2 and HUR-L3) are prime locations to find valuable space rocks. You can also find mineables on moon surfaces (e.g. Lyria, Daymar, Aberdeen) – these appear as large rocks that highlight when scanned. Once a deposit is found, fly within scanning range and center your ship’s nose on it to initiate a composition scan (hold left-click when aimed at the rock). This will tell you what materials are inside and the rock’s instability and resistance levels, which help determine if you can crack it with your current setup.
Fracturing asteroids: Press M to enter mining mode when near a deposit. You’ll see the mining laser interface with gauges for laser throttle (power level), rock energy level, and the all-important green zone (optimal energy window). Begin mining by left-clicking to fire the laser. Start at a low throttle (the laser always starts at a small percentage power) and gradually scroll the mouse wheel to increase power. Your aim is to raise the rock’s energy level into the green zone and keep it there. Larger rocks often have high resistance, so you may need significant power – but as the energy level rises, instability can cause the energy to spike unpredictably. If it goes into the red (overcharge) zone, immediately reduce power or momentarily turn off the laser (release left-click) to avoid an explosion. Fracturing a rock without an overcharge explosion yields several pieces: valuable ones (highlighted in purple on your HUD) that can be extracted, and inert pieces or sub-fractures (yellow highlights) which may need further breaking.
Extraction: After a successful fracture, switch to extraction mode (right-click toggles between fracture and extract modes). In extraction mode, use the laser (left-click) to suck up the purple-highlighted chunks. These will be tractored into your Prospector’s saddlebags as raw ore. Keep an eye on your cargo capacity percentage. If there are remaining large chunks (yellow) that are too big to collect, switch back to fracture mode and break them further. Repeat until you’ve gathered all you can or your hold is full.
At first, using the Prospector’s laser effectively is challenging – every ore has different stability and every rock mass requires a bit of finesse. But as your skill improves, you’ll be able to tackle richer deposits more efficiently. Also consider upgrading your mining laser from the stock one to improve your capabilities. Popular choices for the Prospector’s Size-1 mining head include the Thermyte Concern Helix I (a very powerful laser that cuts through high resistance, though it has a higher minimum power output requiring careful control) or the Impact I mining laser (a great all-around head with a balance of power and stability). Each mining head has trade-offs: for example, the Helix delivers raw power and reduces a rock’s resistance significantly, whereas others like the Lancet offer a huge optimal window and stability but much lower power (note: after recent updates, many miners favor the higher power lasers since overall balance changes made weaker lasers struggle on tough rocks).
To further enhance your mining, utilize mining modules and gadgets. Modules are small sub-components you slot into your laser (the Prospector supports up to two) that provide various boosts. Some modules are passive (always-on effects like a wider green zone or faster charge rate), and some are consumables you can activate for a temporary benefit. For example, a Surge module can be triggered to instantly spike your laser power (great for breaking the initial resistance of a stubborn rock), while a Focus passive module increases the optimal charge window at the cost of some laser power. There are many modules – experiment with combinations that suit your style.
Mining gadgets are handheld devices introduced recently to assist with the hardest rocks. If you find a rock that’s borderline unbreakable, you can land and place a gadget on its surface. Gadgets like the Sabir, BoreMax, or OptiMax alter a rock’s properties (e.g. lowering resistance or instability, or clustering valuable ore together). Calibrate the gadget on the rock, activate it, then return to your ship and try mining again. The gadget’s effects can make the difference in fracturing an otherwise impossible deposit. Once done, don’t forget to retrieve your gadget from the broken pieces to reuse it.
Quantanium is the most valuable ore you can mine – and also the most dangerous. The moment you extract Quantanium, a timer starts (around 15 minutes). If you don’t deposit it at a refinery before the timer expires, the Quantanium in your hold will explode, likely destroying your ship. Your ship’s HUD will flash a warning and an alarm will sound as the cargo becomes unstable. Plan your mining run so that once you have Quantanium on board, you immediately head to the nearest refinery station to offload it. Never linger or try to squeeze in extra mining with Quantanium in your hold!
Refining Your Ore for Profit
After a successful mining run in your Prospector (or Mole), you’ll have a cargo hold full of raw ore. You could sell this raw ore directly at a Trade and Development Division (TDD) desk or admin office at major landing zones, but you’d be leaving money on the table. Serious miners take their haul to a Refinery. Refining raw ore transforms it into refined materials and dramatically increases its sale value.
Head to one of the refinery space stations (each major planet has a refinery station at one of its Lagrange points – for example, CRU-L1 Ambitious Dream Station near Crusader, HUR-L1 near Hurston, ARC-L1 and ARC-L2 near ArcCorp, etc., or MIC-L1/2 for microTech). These stations are dedicated to ore and gas refining and have a Refinery Deck accessible from the hangar elevators.
At the Refinery Deck, look for consoles where you can “Start Refining Order.” Here you’ll be able to select your ship and choose which mined resources to refine. You’ll then pick a refining method. There are multiple refining processes, each balancing speed, cost, and yield. For instance, one method might give a very high yield of refined material but take a long time and cost more (good for valuable cargos if you don’t mind waiting), while another method might be fast and cheap but with a lower yield (perhaps useful for lower-value materials or if you need a quicker turnaround). The interface will show the estimated output, refining fee, and time required for each option. If you’re mining high-value ore like Quantanium, it’s often worth choosing a high-yield method (like Dinyx Solventation or Ferron Exchange) to maximize returns, provided you can wait a few hours. On the other hand, if you just want to cash in quickly on a bulk haul of something like copper, a faster process might suffice.
Important: Once you confirm a refining job, your raw ore is consumed and the process begins. Refining can take anywhere from less than an hour to over a day (in real time) depending on the method and quantity. You don’t have to stay logged in; you can come back later when the job is done. When the refining order is complete, return to the same console to collect the refined materials. They will be stored at that station in containers that you can transfer into a cargo ship. Note that you need a ship with cargo capacity to haul the refined goods to market – the Prospector itself isn’t a cargo ship for refined materials. Many miners keep a small hauler (like a Freelancer or Cutlass) or rent one at the station to ferry their refined ore to a selling point.
Finally, take your refined materials to a trade terminal (TDD or similar) and sell them for profit. You’ll notice a significant increase in earnings compared to selling raw ore. This is the reward for the extra effort and time spent refining.
Advanced Techniques and Team Mining
By now, you’ve learned the solo mining loop. But mining doesn’t have to be a lone venture. Multi-crew mining can be even more profitable and allows you to crack the biggest deposits in the verse. The Argo MOLE (Multi Operator Laser Extractor) is a multi-crew mining ship with three independent mining turrets. With a crew of three skilled miners (plus one pilot, if needed), the MOLE can fracture asteroids far larger and more difficult than a Prospector could handle alone. Each of the MOLE’s mining turrets can be outfitted with different mining heads and modules, allowing a crew to mix laser types for an optimal effect. For example, one operator could use a high-power Helix laser while another uses a stability-focused laser; combined, they can tackle a rock from multiple angles.
Teamwork is key: communication between turret operators to adjust power in sync will prevent overcharge disasters and speed up the fracturing process. A recent improvement in mining mechanics even rewards synchronized mining – when multiple lasers from the same ship focus on a single rock, the rock’s instability is reduced. This means a MOLE with all lasers on one chunk will experience a more cooperative, smoother fracture (conversely, if multiple separate ships like Prospectors fire on the same rock, instability actually increases as a penalty, encouraging the use of a single multi-crew ship instead).
Consider mining as a group for both efficiency and safety. A well-coordinated MOLE crew can break huge asteroids in a fraction of the time, and having extra eyes on scanners means you won’t miss valuable deposits. Plus, working together is just more fun – one person can pilot or scout while others mine, and you can share the profits. Many mining organizations recruit new players and teach them the ropes, so don’t hesitate to team up!
Multi-crew mining tips: assign roles – for instance, one person can be the dedicated pilot, carefully maneuvering the MOLE to give turret gunners the best angle on a rock. Turret miners should communicate rock stability (“getting hot!” or “steady in the green”) and call out if they need the pilot to reposition or if they plan to throttle up or down. If a fragment breaks off, maybe one gunner can peel off to begin extracting the purple chunks while the others continue fracturing the remaining piece. Coordinating these actions can maximize your yield and save time.
Even if you don’t have a full crew, some miners use the MOLE with fewer people or even solo. While solo MOLE mining is less efficient (since you can only operate one laser at a time, and you may have to keep moving between pilot seat and turrets), the MOLE’s larger cargo capacity (96 SCU) and three lasers can still be advantageous for an experienced player who knows how to exploit them – for example, by breaking one rock with one laser, then quickly moving to another turret to break a second rock, and so on. That said, the Prospector remains the king of solo mining due to its agility and simplicity. Choose the tool that fits your playstyle.
Tips for Success in Mining
To wrap up this guide, here are some additional tips and best practices that apply whether you’re a newbie with a multitool or a seasoned veteran commanding a MOLE:
- Plan your mining route: Time is money. If you’re hunting a specific mineral (like Quantanium), go straight to regions known for higher yields (asteroid belts, certain moon regions) and avoid wasting time in low-yield areas. Conversely, if you’re just looking for any profitable rocks, a busy asteroid field like Aaron Halo can keep you occupied with continuous scanning and mining.
- Watch the weather and lighting: On planetary surfaces, darkness or storms can complicate mining. It’s easier to spot shiny outcrops in daylight. Use ship lights or wait for better conditions if you’re having trouble seeing rocks. In space, use your ship’s lights (key
L) when approaching a dark asteroid to avoid collisions. - Upgrade thoughtfully: Better gear yields better results, but it comes at a cost. When starting out, it might be overkill to buy the most expensive mining laser and gadgets. Learn the basics first. As you start tackling tougher rocks that your current equipment can’t handle, then invest in that next upgrade. Each laser (Helix, Impact, Hofstede, etc.) has its niche – read their descriptions and maybe try them on the PTU (public test) or watch others’ experiences before spending your hard-earned credits.
- Stay safe: Miners can be targets for pirates or opportunistic PvPers, since a cargo hold full of quantanium is a juicy prize. Always be aware of your surroundings, especially in known mining spots. Periodically check your radar for incoming ship signatures. If you’re mining outside armistice zones (which you often will be), consider flying with a friend as a guard or asking a security-focused player to escort you for a share of profits. At the very least, the moment you see trouble, be ready to abandon the rock and quantum jump out – your safety is worth more than a chunk of ore.
- Know when to call it: Not every rock is worth the effort. If you encounter a massive deposit with ultra-high resistance or instability that’s spiking all over, it might consume a lot of time, gadgets, and risk for a minimal return. Sometimes it’s better to take what you’ve got and sell, rather than chasing that last bit of ore and potentially losing it all in an accident. Likewise, if your quantanium timer is ticking down to a few minutes, stop mining and go refine! Pushing your luck can turn a successful run into a total loss.
- Practice makes perfect: The mining mechanics have a learning curve. Don’t be discouraged by early mistakes like blown-up rocks or a few empty runs where you didn’t find much. Each failure can teach you something – maybe that you needed to moderate your laser power more carefully, or that a certain region is not great for mining and you should try another spot. With experience, you’ll start recognizing which rocks are worthwhile at a glance and maintaining that optimal charge will become second nature.
Mining is as much an art as it is a science. From the gleam of a gemstone in a dark cave to the thrill of cracking open a gold-laden asteroid, the career offers endless journey and discovery. With this guide, you have all the fundamentals and advanced knowledge to carve out your path as a miner in Star Citizen. Now gear up, fire up those scanners, and go stake your claim among the stars – fortune and adventure await every miner bold enough to seek them. Good luck and happy mining!